
A Pi-Hole server is a piece of software that can be installed on a Raspberry Pi computer, which functions as a network-wide ad-blocker and privacy-enhancing tool. It works by intercepting DNS requests made by devices on a network, and filtering out requests to known advertising and tracking domains. This prevents ads and tracking scripts from being loaded on devices connected to the network, which can improve browsing speed, reduce data usage, and increase privacy.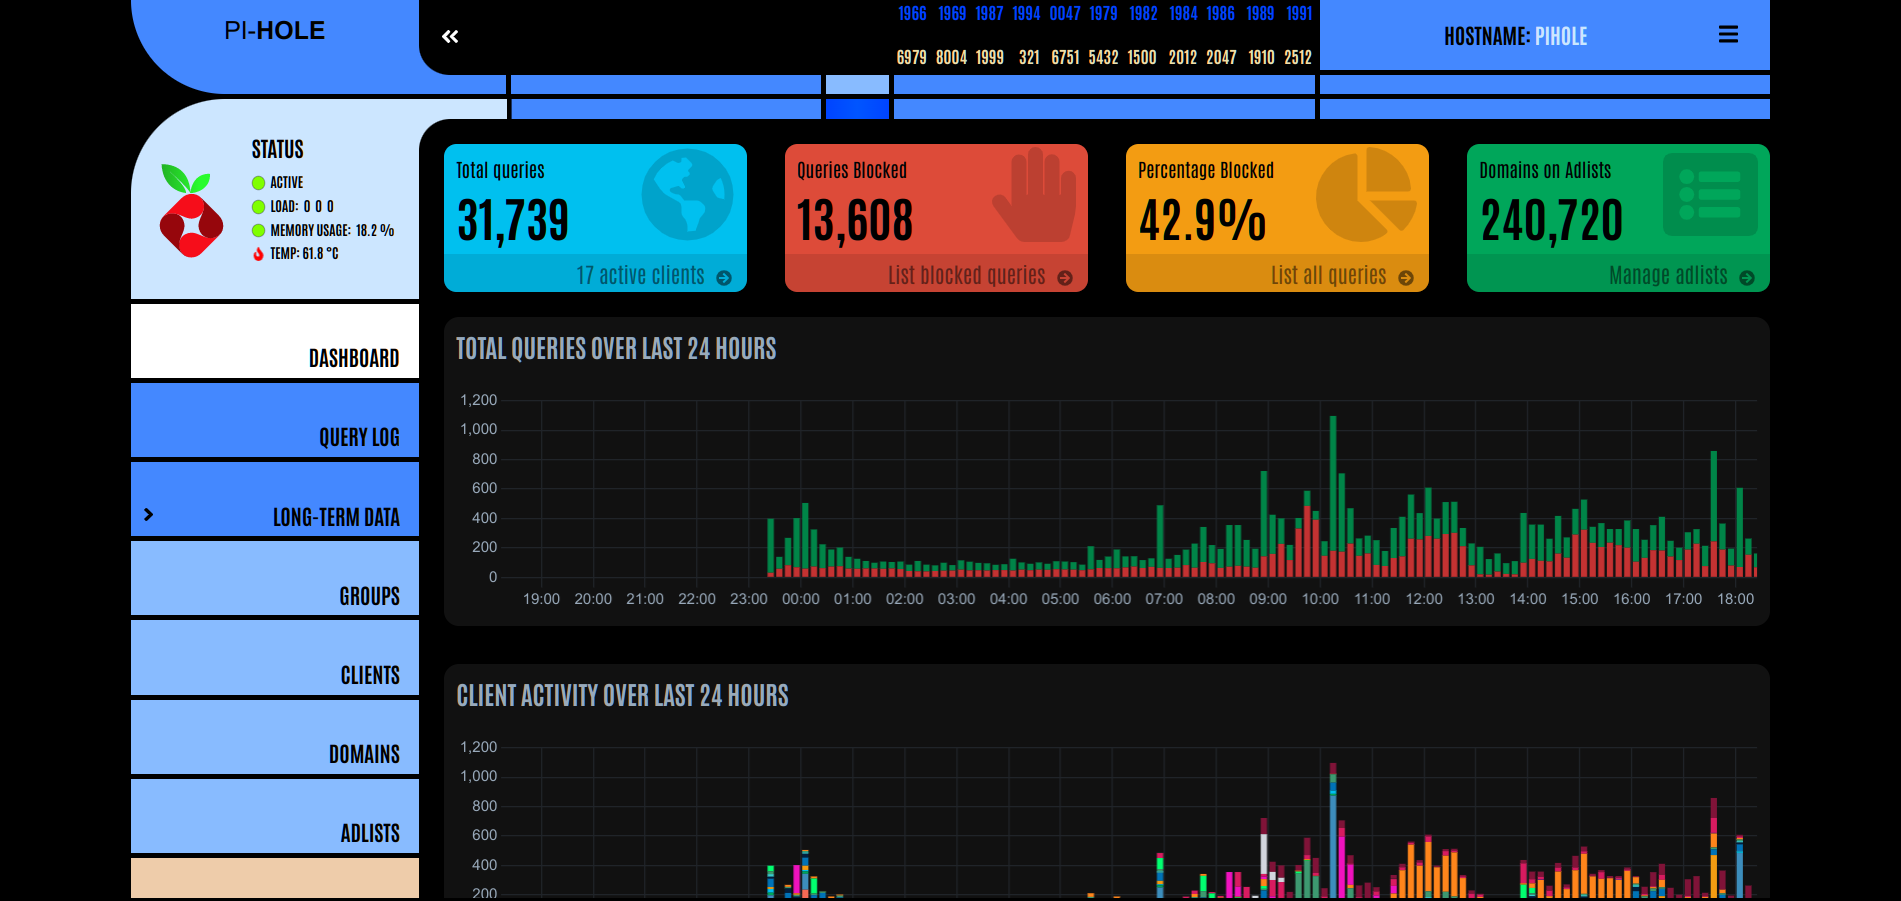
Pi-Hole is a free and open-source project, which means that anyone can download the software and install it on their own Raspberry Pi or other compatible device. It is designed to be easy to set up, with a web-based interface for managing settings and monitoring activity. Once installed, Pi-Hole can be configured to block a variety of different types of content, including ads, tracking scripts, malware domains, and more.
Pi-Hole is a popular tool for home and small office networks, but can also be used in larger enterprise environments. It can be configured to work with a wide range of devices, including desktops, laptops, smartphones, smart TVs, and other internet-connected devices. In addition to blocking ads and improving privacy, Pi-Hole can also provide insights into network activity and help to identify potential security threats.
Preliminaries to Installation
Prior to installing a Pi-Hole server for your network, you'll need to pay attention to the following prerequisites, which means you'll need:
- A Raspberry Pi or other compatible SBC device: Pi-Hole can be installed on a Raspberry Pi computer, as well as other devices running Linux. Make sure that your device is compatible with the Pi-Hole software.
- A network connection: Your Pi-Hole server will need to be connected to your home or office network in order to intercept DNS requests from connected devices.
- A static IP address or DHCP Reservation IP Address: It is recommended to assign a static IP address to your Pi-Hole server to ensure that it always has the same address on your network. This can be accomplished by setting up a static IP on the device/node itself or, like I have done, you can setup a DHCP reservation IP Address on your gateway router. Each router is different, but most of them have this capability today.
- A MicroSD card for your Raspberry Pi with at least 8GB capacity. Thirty-two (32) GB or more is recommended. In my particular case, I am using a 128GB MicroSD card of fairly high quality. I recommend either SanDisk or Samsung. The disk I'm using is a SanDisk Ultra 128GB card. The reason I stress high-quality MicroSD card is because there will be quite a bit of read/write operations over the course of the card's lifetime and the Raspberry Pi will be running 24/7/365.
- Basic Linux knowledge: You will need to be comfortable with using the Linux command line to install and configure the Pi-Hole software.
- Access to your router's DNS settings: You will need to be able to configure your router's DNS settings to point to your Pi-Hole server.
- Time and patience: The process of setting up Pi-Hole can take some time and may require troubleshooting if issues arise.
Once you have these items checked off, you're ready to start the installation.
Installing the Raspberry Pi Operating System and Pi-Hole Server
There are several ways you can install the right operating system for your Raspberry Pi prior to installing the Pi-Hole server, but the software package I highly recommend for this process is called Raspberry Pi Imager. Sure, there are other packages, such as UnetBootin, Rufus, and Balena Etcher, but the advantage of using the Raspberry Pi Imager software is that it has pre-configured OS options built in to the menus. If you're running Ubuntu Linux, obtaining this recommended installation software is as easy as running the following command in the Terminal:
$ sudo apt install rpi-imager
If you're running MS Windows or MacOS, then visit this website to download the RPi Imager software for those operating systems. From this point forward, I'm going to only talk about installing the Pi-Hole server in Linux, since this is my OS of choice.
Once you have the Raspberry Pi Imager software installed on your system, then insert the MicroSD card into the MicroSD card adapter, insert it into the SD Card Reader in your computer, and launch the Raspberry Pi Imager software on your system. It will bring you to the following screen:
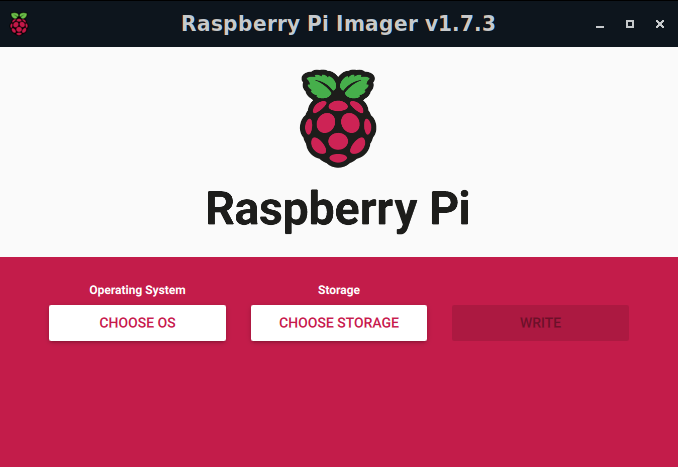
Click the Choose OS button under Operating System, then select Raspberry Pi OS (Other), scroll down to Raspberry Pi OS-Lite (64-bit), and this will load that into the Operating System window. Next, click the Choose Storage under the Storage section, and select the MicroSD card which you wish to use for your Pi-Hole Server and this will be reflected under the Storage section. Ensure that you have chosen the correct card before committing the Write operation or you may lose valuable data. And, finally, before clicking on the Write button, select the Gear button below and perform the following Advanced Options:
- Tick the checkbox next to Set Hostname and label the hostname appropriately. I set mine to PiHole.local
- Tick the checkbox next to SSH, and below that tick the radio button for Use Password Authentication.
- Tick Set Username & Password after scrolling down the screen and type the username you wish to use and a strong password as well (recommend at least 8 characters). This is all that you need to do in this interface.
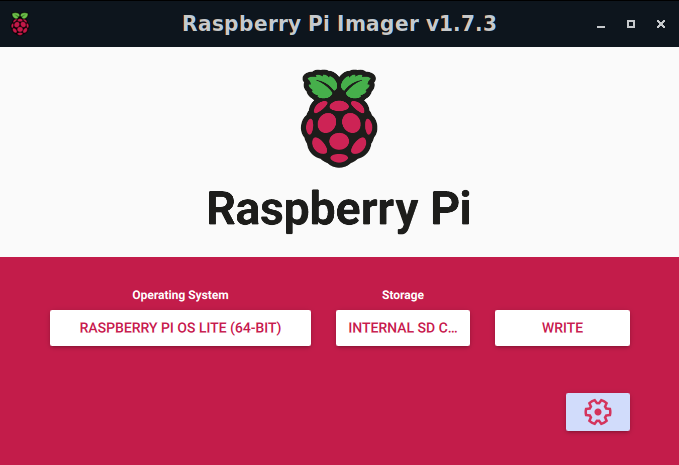
Now, you can click the Write button and let Raspberry Pi Imager format the MicroSD Card and install the Raspberry Pi OS-Lite (64-bit) software on the card. This is what the software package should look like prior to committing the Write to the card.
Once this is accomplished, remove the MicroSD Card from the adapter and insert it into your Raspberry Pi and reboot the Raspberry Pi. The system should take around 30 seconds to one minute to boot up and be ready to SSH into.
At this point, you need to determine the IP address that your router's DHCP server has assigned to your Raspberry Pi or decide which IPv4 Address you wish to use as a static IP Address assignment. In my case, I chose 192.168.1.90 since I have a 192.168.1.0/24 network. You will want to ensure that your IPv4 Address is statically assigned not handed out by DHCP since you do not want this address changing on you if you power down and power up the Raspberry Pi in the future. There are two methods for achieving this:
Method 1:
Go into your Gateway router and navigate to the LAN > DHCP Server section. Look to see if the Raspberry Pi device is listed (by MAC address) with an assigned IPv4 address. If so, and you want to use that IPv4 Address, then use this address as a DHCP Reserved IPv4 Address. The screenshot of my router with 192.168.1.90 under the Enable Manual Assignment as the IP Address looks like this:
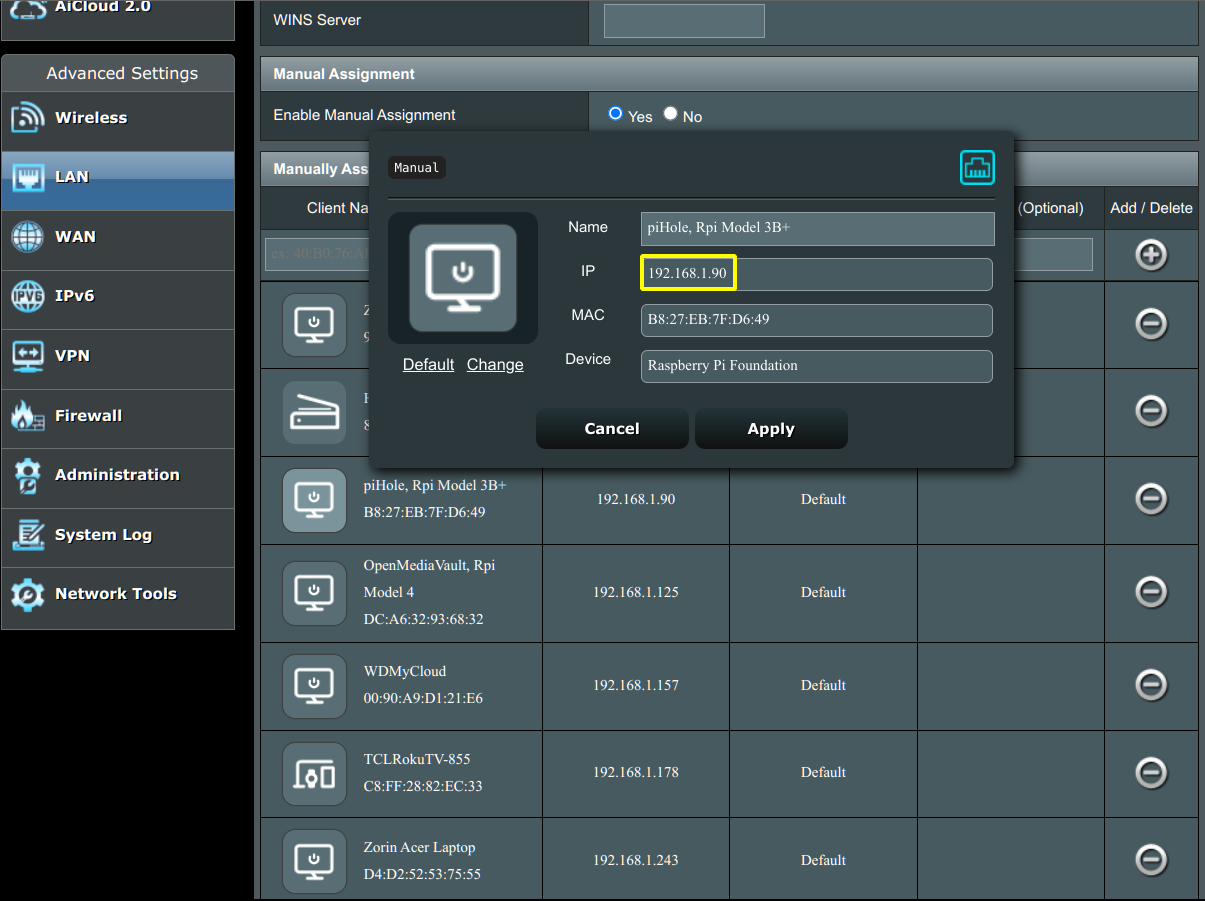
Apply the settings in the router and going forward, your router will not hand out this IPv4 Address to any other device on your network but, instead, will reserve this IPv4 address for your Raspberry Pi.
Method 2:
Set the IPv4 Address for your Raspberry Pi statically on the device itself. If you know that the IPv4 Address you want to use is available, then run the following command in Linux to create the following file using your favorite text editor. Here, I used nano:
sudo nano -w /etc/dhcpcd.conf
Then, scroll down to the section titled: #Example static IP configuration and uncomment the appropriate lines and modify the file to change the following:
Static IP: 192.168.1.90/24 Gateway: 192.168.1.1 DNS Servers: 192.168.1.1 8.8.8.8
Save and close the file, and reboot the Raspberry Pi. The new IPv4 address should now be permanently assigned to the device.
Install Pi-Hole Server
Run the following command in the Raspberry Pi's Terminal:
curl -sSL https://install.pi-hole.net | bash
- An ncurses dialog window will open up. Hit the Enter key to select OK and go on to the next window.
- You're shown a Web link where you can donate to the project. Make a note of it and press the Enter key to select OK.
- You are taken to a window asking you to setup a static IP for your Pi-Hole server. Since you have already performed this, select Continue and press Enter to move forward.
- On the next screen, confirm the settings for your Static IP and Gateway addresses, and then select Continue and press the Enter key to move forward.
- Hit the Enter key to select OK on the next screen to move forward in the process.
- On the next screen, select an upstream DNS Server to use. Here, I chose OpenDNS, then selected Continue and pressed the Enter key to move on.
- On the next screen you're asked to select a Block List. Select YES to choose the default list and press Enter to accept and move to the next window
- Next, we're asked if we wish to install the Admin Web Interface. Choose YES and press Enter to move forward.
- Read the Web Server information on the next screen, then choose YES and press Enter to continue.
- Next, we're asked if we would like to enable Query Logging. Select YES and press Enter to continue.
- On the next screen, select YES and press Enter to continue.
- Finally, we reach the Installation Complete screen. Here, you will need to read the information that tells you how to access the Admin Web Interface. In my case, that interface could be reached at http://192.168.1.90/admin and an initial password is provided.
I chose to overlook this password and change the password to something else. This is accomplished by running the command:
$ pihole -a -p
Enter the password you wish (strong password) and repeat it to save the password.
Logging Into The Pi-Hole GUI
Open a Web browser on your Desktop system and navigate to the following URL:
http://<Your Rpi's IP Address>/admin
This should reveal a login screen that looks like the following:
Enter your password and click Log in.
 The Dashboard that is revealed looks like the following except yours will probably be blank, for the most part, since you have not turned on the Pi-Hole functionality yet and started receiving DNS queries:
In my particular case, I've had the Pi-Hole server running for almost 24 hours, so there is plenty of data here to look at. The Total Queries received and number of Active Clients is shown in the first box to the left in the Dashboard window. Clicking on the Active Clients will reveal the names of these clients along with information such as the IP Address, Hardware Address, Interface the device is on, Hostname, First Seen, Last Query, Number of Queries, Uses Pi-Hole (Y/N), and an Action button. The next box to the right displays the Total Queries Blocked along with a link to List Blocked Queries. In the next box to the right of the 2nd, the Percentage Blocked and link for List all Queries is available. In my case, 42.1% of the queries are being blocked. The final box to the far right shows the total domains being blocked on AdLists. In my case, there are 240,720 domains being blocked via nine (9) lists that have been installed not counting the default list.
The way that AdLists are installed in Pi-Hole is fairly straightforward. You can visit the Firebog Blocklist Collection website to find the recommended lists to add. The lists are in four categories: Suspicious Lists, Advertising Lists, Tracking & Telemetry Lists, and Malicious Lists. There is an Others List, but I ignored that one. My recommendation to you is to copy the top two (Green, not Blue or Stricken) from each category one at a time and add them to Pi-Hole's AdList section by clicking on this link in the left sidebar, adding each list to the Add a new List section, then clicking the Add button for each list you add. The AdList is referred to as the Gravity in Pi-Hole.
You can update the Gravity by clicking on the Update Gravity selection in the left sidebar.
Optionally, you can install a package with your Pi-Hole server called Unbound DNS. This package can be installed by running the following command in the Terminal:
$ sudo apt install unbound -y
Once installed, you'll want to create and modify a file called pi-hole.conf by running the following command in the Terminal:
$ sudo nano -w /etc/unbound/unbound.conf.d/pi-hole.conf
Once the nano text editor window opens, you'll want to add the following to the empty file you just created and save that file:
server: # If no logfile is specified, syslog is used # logfile: "/var/log/unbound/unbound.log" verbosity: 0
interface: 127.0.0.1 port: 5335 do-ip4: yes do-udp: yes do-tcp: yes
# May be set to yes if you have IPv6 connectivity do-ip6: no
# You want to leave this to no unless you have *native* IPv6. With 6to4 and # Terredo tunnels your web browser should favor IPv4 for the same reasons prefer-ip6: no
# Use this only when you downloaded the list of primary root servers! # If you use the default dns-root-data package, unbound will find it automatically #root-hints: "/var/lib/unbound/root.hints"
# Trust glue only if it is within the server's authority harden-glue: yes
# Require DNSSEC data for trust-anchored zones, if such data is absent, the zone becomes BOGUS harden-dnssec-stripped: yes
# Don't use Capitalization randomization as it known to cause DNSSEC issues sometimes # see https://discourse.pi-hole.net/t/unbound-stubby-or-dnscrypt-proxy/9378 for further details use-caps-for-id: no
# Reduce EDNS reassembly buffer size. # IP fragmentation is unreliable on the Internet today, and can cause # transmission failures when large DNS messages are sent via UDP. Even # when fragmentation does work, it may not be secure; it is theoretically # possible to spoof parts of a fragmented DNS message, without easy # detection at the receiving end. Recently, there was an excellent study # >>> Defragmenting DNS - Determining the optimal maximum UDP response size for DNS <<< # by Axel Koolhaas, and Tjeerd Slokker (https://indico.dns-oarc.net/event/36/contributions/776/) # in collaboration with NLnet Labs explored DNS using real world data from the # the RIPE Atlas probes and the researchers suggested different values for # IPv4 and IPv6 and in different scenarios. They advise that servers should # be configured to limit DNS messages sent over UDP to a size that will not # trigger fragmentation on typical network links. DNS servers can switch # from UDP to TCP when a DNS response is too big to fit in this limited # buffer size. This value has also been suggested in DNS Flag Day 2020. edns-buffer-size: 1232
# Perform prefetching of close to expired message cache entries # This only applies to domains that have been frequently queried prefetch: yes
# One thread should be sufficient, can be increased on beefy machines. In reality for most users running on small networks or on a single machine, it should be unnecessary to seek performance enhancement by increasing num-threads above 1. num-threads: 1
# Ensure kernel buffer is large enough to not lose messages in traffic spikes so-rcvbuf: 1m
# Ensure privacy of local IP ranges private-address: 192.168.0.0/16 private-address: 169.254.0.0/16 private-address: 172.16.0.0/12 private-address: 10.0.0.0/8 private-address: fd00::/8 private-address: fe80::/10
Next, you'll want to run these two commands one after the other:
sudo service unbound restart
to restart the unbound service, then
sudo service unbound status
to verify that it is running. If you see "active:running" in green in the output, then the unbound service has restarted properly without errors.
Using Unbound With Pi-Hole
To use the Unbound service, from the Pi-Hole Dashboard, click on Settings > DNS (tab) and you'll be taken to this screen:
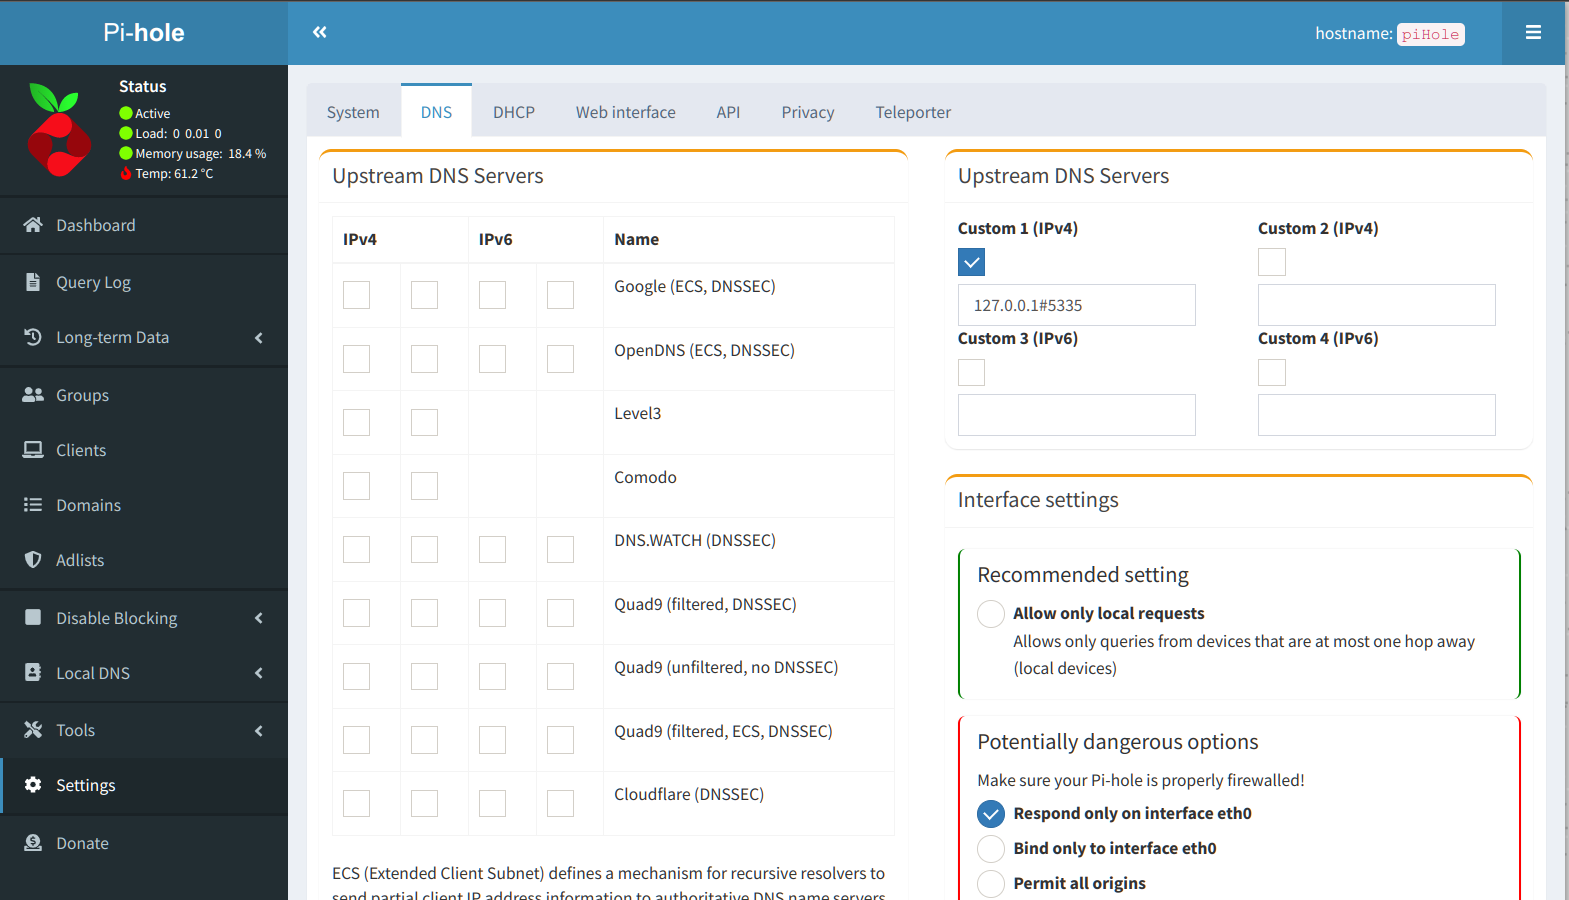
Uncheck any Upstream DNS Servers under IPv4 or IPv6 that may be present on the left-hand side and tick the box for Custom 1 Upstream DNS Servers on the right-hand side. In the window add 127.0.0.1#5335, which represents the Localhost address (corresponding to the private IPv4 address of your Raspberry Pi) followed by the # symbol and port 5335. Next, scroll down and tick the box under Interface Settings that reads: Respond only on interface eth0 and click Save to save the changes. Now, you'll want to return to your home router and configure your router to use your Raspberry Pi's IPv4 Address as the DNS server since Unbound is running that service for us and we have setup a custom DNS inside of Unbound. The location of this area in your router may differ slightly from router to router, but for me it looks like the following:
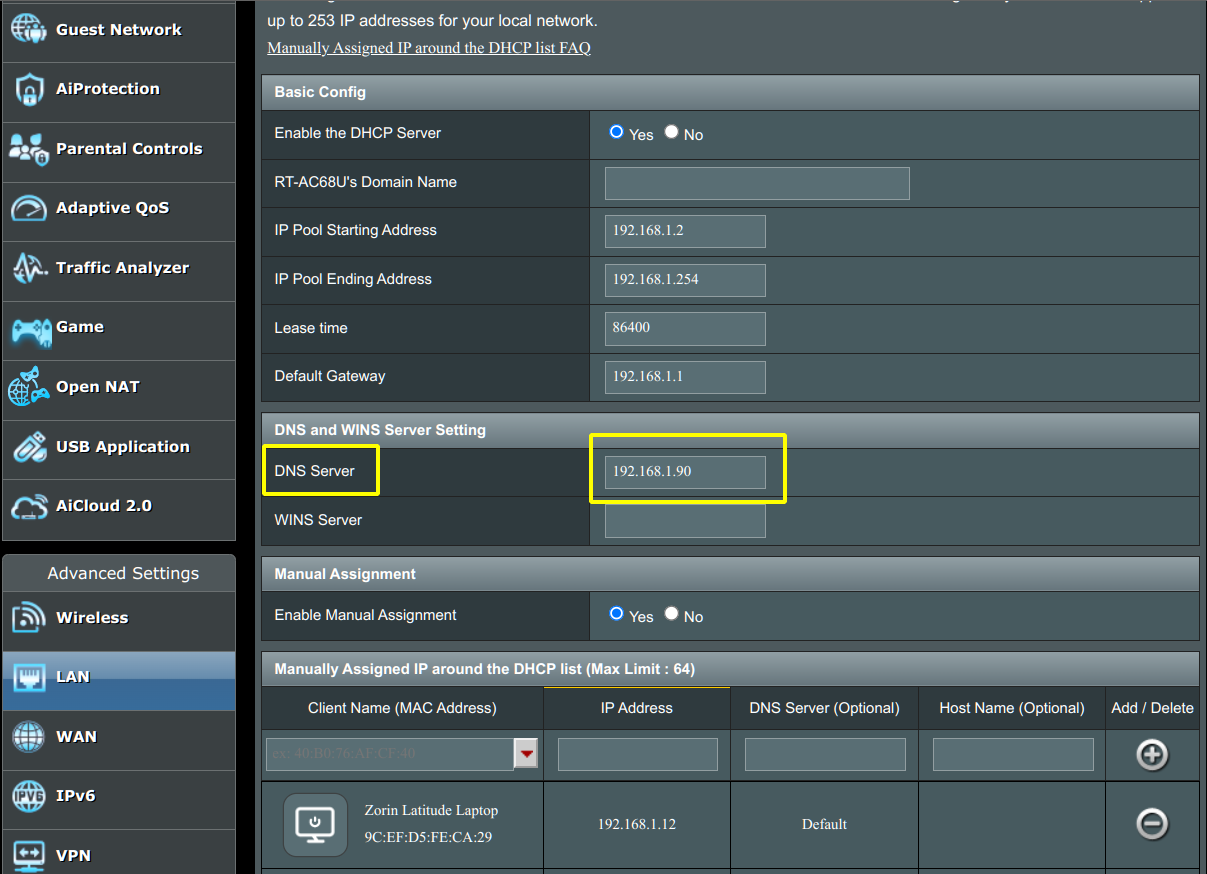
These settings are under the LAN section under the DHCP Server tab on my router. Here, I loaded 192.168.1.90 in the DNS Server designation area. As a result, all DNS queries from devices on my LAN will be redirected to my Raspberry Pi's DNS Server (Unbound) service rather than allowing the devices to connect to one or more DNS servers on the Internet, such as Google or OpenDNS. The Unbound service running on your Raspberry Pi will pick up its upstream DNS entries from Root servers on the Web and your Pi-Hole Server will be able to manage these DNS queries from this point forward.
A Rundown of the Basics For Using Pi-Hole Server
Rather than continuing to discuss in this blog article all of the facets of the Pi-Hole Server, I have created a short video which I shared with a friend that shows you in real time the various basic services you can take advantage of on your Pi-Hole Server. If properly configured, the Pi-Hole Server should not block any services that you or other family members have been accustomed to accessing across the Web, such as shopping sites, lookup sites for products/services, etc. But, if you do find that something is being blocked, it is rather easy to remedy that by stopping the Pi-Hole Blocking for a short duration while you isolate the domain that is being blocked (if that's the case) and Whitelisting that domain (if it's not a malicious domain).
This is accomplished by clicking on Disable Blocking in the left sidebar of the Dashboard, where it expands and you can choose from the list the duration of disabling of Pi-Hole blocking that you wish to invoke. The typical time is 5 minutes. Then, once you discover the domain that you need to Whitelist, you can Enable Blocking once again and test whether you or the family member have regained access to the previously blocked domain.
- Log in to post comments