In this article I’m going to discuss a Raspberry Pi (RPi) backup strategy that I use and that I recommend you use as well in backing up your RPi devices. This assumes, of course, that you own such devices.
I own two RPi devices. One of these devices is a RPi, Model 3B+ with 1GB of RAM and 32GB MicroSD card, running Debian 10 “Buster”, which serves as my OpenMediaVault 2TB NAS—a secondary NAS for the home in addition to a 4TB RAID 1 NAS running WD MyCloudOS5—and the second device is a Model 4 with 4GB of RAM and a 256GB MicroSD card, running Debian 11 “Bullseye”, which runs my Docker Container environment supporting 8 separate Docker containers managed with Portainer and accessible across the Internet using Nginx Proxy Manager. Seeing that these two RPi machines support somewhat critical infrastructures, it is imperative that a good backup strategy is implemented whereby these devices are updated at regular intervals on an at least weekly if not daily basis.
Traditional RPi Backup Strategy
The general methodology for backing up a RPi device might be to rsync all of the files over to a stored location for safekeeping in the event the RPi device falls over. However, the RPi’s use a MicroSD card and it would really be handy if, in the event the MicroSD card fails, we could just pop in a replacement MicroSD card with the latest image of the RPi rather than having to rebuild the new MicroSD card with the OS, reinstall all the programs/servers/databases, then copy back all the data that we stored for safekeeping in a remote location earlier. This could be a very tedious and time-consuming operation to say the least. One of the major drawbacks, however, for imaging the MicroSD card as your backup is that depending on the PC that you use to backup the MicroSD card and the size of that MicroSD card, this process could take quite some time even using rsync to perform it. For example, on my Dell Inspiron E3668 dual-core i5 CPU running 3.49 GHz mini-tower PC with 16GB of RAM, it takes approximately 25 minutes to backup the 32GB MicroSD card in my RPi, Model 3B+. It takes about 2 hours or more to perform the same rsync operation for creating the image of the 256GB MicroSD card. In other words, the traditional backup process can be quite time consuming for these RPi backups even when using rsync. The backups are performed using a MicroSD card-to-SD card converter and using the SD card slot in the PC to perform the backup procedure. Wouldn’t it be nice if we could backup and store a base image of the RPi device every day or once-a-week and keep your backups within a day or so from current? Well, you can and, in this article, I’m going to explain the process which I call the ultimate RPi backup strategy that can be accomplished in Linux.
The Ultimate RPi Backup Strategy
To perform the backups, you can use either a USB adapter into which you insert the MicroSD card that you then insert into an available USB3 slot/port on your PC, or you can insert the MicroSD card into a MicroSD-to-SD card adapter, and insert that into a regular SD card reader slot on the PC. The latter method is what I am currently using. Once this is done, it’s a simple matter of extracting the contents of the image from the MicroSD card to a file which you then place in some location on your PC using the Linux _dd_ command. Before doing this though, you can run the following command to determine how your PC’s OS sees your microSD card SD devices:
`$ dmesg | grep sd`
... [sdi] Attached SCSI Removable Disk
then, based on this output, you run the _dd_ command as follows:
`$ sudo dd if=/dev/sdi of=pi.img bs=1M status=progress`
Once the process completes, which can take a while depending on the size of your MicroSD card and the speed of your PC, you can list out the storage to look at the results:
`$ ls –lh`
and you should see the results of pi.img that you issued to dd as the output file. This is just an image, so we should be able to run fdisk on it like so:
`$ sudo fdisk pi.img`
Using the command _p_ in fdisk to print out the results, you will see the size of the image in GB along with the number of bytes and sectors that the image takes up on disk. Additionally, the unit: sectors (typically 1 unit = 512 bytes), sector size (logical/physical) usually 512 bytes / 512 bytes, I/O Size (minimum/maximum) 512 bytes / 512 bytes, Disk label type: DOS, and the Disk identifier (in hex) will be displayed. Another bit of information that is extremely important to the backup process can be seen below:
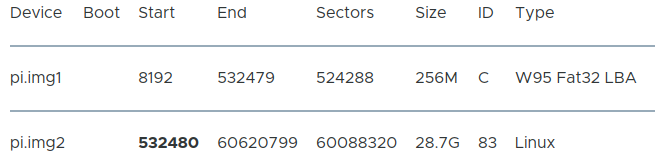
Now, we can mount the file in Linux using the loop device built into Linux. This way, Linux treats the file as though it were a device to be mounted. To do this though requires us to know at what point in the file the file system begins. This starting point of the file system is referred to as the _**offset**_. Loop will need to know this offset value. But, how do we calculate that? So, if you look at the diagram above which represents the terminal output from running fdisk on pi.img, you can see that the Start value is 532480 (shown in bold in the table). This represents the number of units to the Start point. However, each unit is 512 bytes, so we need to multiply them together, such that the Start position is 532480 X 512 = 272629760. This is the number of bytes before reaching the Start point in the file system that Loop will need to know. So, to mount pi.img (the file masquerading as a device) we can run the following loop command in the terminal:
`# mount –o loop, offset=272629760 pi.img /mnt/pi`
When this is run, pi.img will be mounted at /mnt/pi using loop which sees pi.img as a device, not a file. Now, if we list the storage using ls -l, we see:
bin boot.bak etc lib media opt root sbin sys usr
boot dev home lost+found mnt proc run srv tmp var
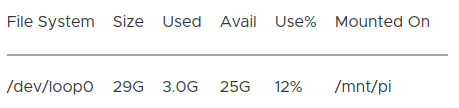
This listing of storage on the device pi.img looks very much like what could be considered a Raspberry Pi image. Let’s take a look at just exactly how much of the file system is in use in this image. To do this, run:
# df –h /mnt/pi
So, if we run:
`# du –sh pi.img`
**29G** **pi.img**
is there any way that we can store an image backup of the image on disk that doesn’t take up as much space as 29G? There is such a way to accomplish this which is built into Linux and it is called _sparse files_.
There is a program in Linux called _zerofree_ which zeros out all of the unused blocks in an ext2/3/4 file system. All files contain unused blocks which consist of either zeros or ones. The idea here is that the program _zerofree_ will replace all of those unused blocks with zeros so that Linux doesn’t see or report those blocks and hence the only part of the file which is backed up that is stored on physical disk is a small percentage of the actual file size since Linux reports the used blocks and a little bit of bookkeeping instead.
In my particular case, I’m running MX Linux and _zerofree_ is not installed by default and must be installed in order to use it. I installed it by running:
$ sudo apt install zerofree
zerofree finds the unallocated blocks with non-zero value content in an ext2, ext3 or ext4 file system (e.g. /dev/sda1) and fills them with zeroes (or another octet of your choice). Filling unused areas with zeroes is useful if the device on which this file-system resides is a disk image. In this case, depending on the type of disk image, a secondary utility may be able to reduce the size of the disk image after zerofree has been run. zerofree cannot be run against a file, but must be run against a device. We can accomplish this by running the following command:
`# losetup - - find - -show pi.img –o 272629760`
/dev/loop0
In the above command, - – find locates the first available loop device on our system (here, it is /dev/loop0). The - – show command displays that loop device. The pi.img is our file which is being masqueraded as a loop device. The – o is our offset. And, the number at the end of the command is the offset where the file system begins, which we calculated earlier.
Now, we can zero out the file system by running the command:
`# zerofree –v /dev/loop0`
0/6604340/7511040
and zerofree happily believes that loop0 is a loop block device rather than in actuality being a file. And, now, we can take down the loop block device by running the command:
`# losetup –d /dev/loop0`
Let’s check to see how much disk space our image takes now by running:
`# du –sh pi.img`
29G pi.img
But, wait, the amount of disk space hasn’t changed all that much if anything. The reason for this is because writing a bunch of zeros to a file where there are unused blocks does not make the file any smaller or make it sparse. However, there is a way of taking those zeros and making them _seek_ and not writing them to disk.
Fortunately, there is an rsync command that makes a file sparse. That command is:
`# rsync - – archive - – progress - – verbose - – sparse pi.img`
After running this command, which will take roughly three minutes or more, then we can follow up this command with the following to list out the storage on the two files:
`# ls –l pi*img`
-rw-r- -r- - 1 root root 31037849600 Jul 21 16:36 pi-sparse.img
-rw-r- -r- - 1 root root 31037849600 Jul21 16:36 pi.img
So, now if we look at the disk usage taking place for each of these files even though the block size is identical by running the command:
`# du –sh pi*img`
2.9G pi-sparse.img
29G pi.img
you can clearly see that the sparse file is taking up only 10% of the size on disk as the original image file. However, if you read in the sparse file, you’ll see exactly the same information as you will if you read in the full version of the file (pi.img). The only difference is that the zeros created from zerofree are not stored on disk, just a little bookkeeping by the Linux OS which knows where they are.
Conclusion
So, using this technique has allowed us to store a file as backup which is roughly 10% of the original file size instead of storing the original file. Just keep in mind, however, that you will need to use the options in rsync to preserve the sparse-ness of the file when retrieving it.
We went to all that trouble to create a sparse image of the backup of the Raspberry Pi image, but, now, how do we keep that image up to date without suffering any downtime on the RPi device itself? The answer is fairly simple. Once a day or once a week, depending on the schedule you decide to pick, you mount the image using the loop back device to some place in your file system, you rsync the files over from the RPi to the mounted file on the file system, and then you unmount it. Don’t forget the /boot partition as well. Under the hood, the disk image stored on your PC will be updated to the disk image running on the RPi at the time you performed the rsync. Obviously there may be files changing while you’re performing the rsync operation and that could make them a little skew, but this is minimal and the result should be just as good as a regular rsync. And, you can back up your disk image using normal file transfer and backup tools so you can have, for example, an off-site backup of your RPi image and the transfer will go much faster and more efficiently transferring over the network because it is sparse and you can use rsync.
- Log in to post comments