The firewall is a vital component of any Linux distribution. This is even more important when running a server versus a desktop distro. Firewalls are necessary since they protect a computer system or a network of computers from an external attack especially in a server environment where the server is connected to the Internet in an always-on Internet connection.
In this article, I’m going to cover the basics of the CentOS 8 Server firewall configuration. Most distributions of Linux have firewalls. Ubuntu Linux, for example, has the ufw (Uncomplicated Firewall) which is a GUI interface which makes it very easy for a user of the system to configure their firewall protection on that system. CentOS 8 Server, however, uses a different firewall called firewalld. While firewall configuration can be complex, CentOS 8 provides command-line, web-based, and graphical tools that ease the firewall configuration process.
Introduction to Firewalld
Firewalld, like most firewall applications in Linux, has a service called firewalld.service since CentOS 8 Server uses Systemd. This service uses a set of rules to control incoming network traffic and defines which traffic is allowed to pass through to the system and which is blocked. The firewalld is built on top of a more complex firewall tool called iptables. The firewalld interface provides a more flexible means of managing network traffic so that direct access to and knowledge of configuring iptables isn’t necessary. The CentOS 8 Server firewall, for example, can be configured to block traffic arriving from a particular TCP/IP port or from a specific IP address. The sysadmin can setup rules in the firewall to forward incoming traffic to different nodes on the network or to act as the Internet gateway to protect other computers which are on the local area network (LAN).
Typical firewall security practices block all access through the default firewall configuration with the exception of SSH remote access login and the DHCP service used by the system to obtain a dynamic IP address. These are essential configurations of a default firewall to allow a sysadmin to gain access to the system after completing the initial installation. Key elements of firewalld and its configuration in CentOS 8 Server are: zones, interfaces, services, and ports.
Zones
Out of the box, firewalld comes with a range of pre-configured zones. A zone is a pre-configured set of rules which govern the access and flow of network traffic which when applied to the system implements the firewall configuration for various network scenarios. One such zone called the block zone blocks all incoming traffic, while another called the home zone imposes less strict rules based on the assumption that the system is running in a safer environment where a greater level of trust is expected. New zones may be added and existing zones may be deleted at anytime in the system using firewall tools. The default zones which are created when CentOS 8 Server is installed are as follows:
| Zone | Description |
| drop | This is the most secure zone. Only outgoing connections are permitted and all incoming connections are dropped without any notification to the client connecting to the server. |
| block | Same as the drop zone except incoming connections are rejected with an icmp-host-prohibited or icmp6-adm-prohibited notification. |
| public | This zone is intended for use when the computer is connected to public networks or the Internet where other computers are not trusted. Allows select incoming connections. |
| external | This zone is configured when the system is acting as the Internet gateway for a network of computers. The zone is used in conjunction with the internal zone when masquerading or NAT is implemented. |
| internal | This zone is used with the external zone and is applied to the interface that is connected to the internal LAN. This zone assumes that computers on the LAN are trusted and allows for selected incoming connections. |
| dmz | Used when a system is running in the demilitarized zone (DMZ). This is typically used for computers that are publicly accessible but isolated from other nodes on your internal LAN. Allows for select incoming connections. |
| work | For use when running a system on a network in a work environment where other computers on the LAN are trusted. Allows for select incoming connections. |
| home | Used when running a system on a home network where all the computers on the LAN are trusted. Allows for select incoming connections. |
| trusted | This is the least secure zone. All incoming connections are accepted. |
Interfaces
CentOS 8 systems connected to the Internet or a LAN (or both) will have at least one interface in the form of either a physical or virtual device. Each of these interfaces is assigned to a zone allowing different levels of firewall security to be assigned to different interfaces when firewalld is turned on. In the case of a CentOS 8 Server with at least two interfaces, one connected externally to the Internet and the other to an internal network, the external facing interface would most likely be assigned to the more restrictive external zone while the internal interface would likely use the less restrictive internal zone.
Services
Secure HTTPS web connections, for example, use port 443. SMTP email service uses port 25. To selectively enable incoming traffic for these specific services, firewalld rules can be added to zones. The home zone, for example does not permit incoming HTTPS connections by default. This traffic, however, can be enabled by adding rules to a zone to allow incoming HTTPS connections without having to reference any specific port number.
Ports
There may be certain situations where incoming connections need to be allowed on a specific port that is not allocated to a specific service. This can be achieved by adding rules that reference these specific ports instead of the services themselves. For example, we can create a firewalld rule that allows traffic over port 9090/tcp to permit access to a web-based application called Cockpit that needs access to a web interface.
Checking Firewalld Status
In CentOS 8, the firewalld service is installed and enabled by default. Its status can be checked by running the command:
# systemctl status firewalld
If firewalld isn’t installed for some reason, then it is easy to install by running this command:
# dnf install firewalld
Once installed, you can ensure that the firewall starts up on initial boot or after a reboot by running the command:
# systemctl enable firewalld --now
This command not only enables the firewall so the service is permanent, but it also starts the firewall immediately.
Configuring Firewall Rules with firewall-cmd
The firewall-cmd CLI utility allows information about the firewalld configuration to be viewed and changes to be made to zones and rules from within a terminal window. Changes made to the firewalld configuration settings can be made at runtime and permanent. By default, any changes made to firewalld using firewall-cmd are considered to be runtime changes. This means any configuration changes made using this tool will not be permanent but rather will not survive a reboot or a reload of the firewalld service. Reloading the firewalld service is made using the command:
# firewalld --reload
In order to make a change permanent, the –permanent command-line option must be used. Permanent changes don’t take effect until the firewalld service reloads but will remain in place until manually changed.
Identifying and Changing the Default Zone
To identify the default zone that all interfaces are configured to use unless otherwise specified, run the following command using the firewalld-cmd command:
# firewall-cmd --get-default-zone
To alter the default zone to another zone, run:
# firewall-cmd --set-default-zone=trusted
Displaying Zone Information
To list all the available zones on the system:
# firewall-cmd --get-zones
To see a listing of all zones currently active together with the interfaces to which they are assigned, run:
# firewall-cmd --get-active-zones
Furthermore, all the rules currently configured for a specific zone may be listed as follows:
# firewall-cmd --zone=public --list-all
Moreover, to obtain the list of services currently available for inclusion in a firewalld rule, run the following:
# firewall-cmd --zone=internal --list services
and, a list of port rules can be obtained as follows:
# firewall-cmd --zone=public --list-ports
Adding / Removing Zone Services
It is very easy to add a service to a zone using firewall-cmd. For example, to add the HTTPS service to the public zone, the following command is used:
# firewall-cmd zone=public --add-service=https
As mentioned earlier, this rule, by default, is a runtime change. To make this a permanent change so that it remains in effect the next time the system restarts, use the permanent flag:
# firewall-cmd --zone=public --permanent --add-service=https
Then, to ensure this service has been added permanently, use the –permanent flag when requesting the service list:
# firewall-cmd --zone-public --permanent --list-services
The rule will not take effect as a permanent rule, however, until the system has been restarted or we run:
# firewall-cmd --reload
to reload the firewall. To remove a service from a zone, use the –-remove-service option. Since this rule is a runtime change, the rule will be re-instated the next time the system restarts:
# firewall-cmd --zone=public --remove-service=https
and, to remove this service permanently, enter this command:
# firewall-cmd --zone=public --permanent --remove-service=https
Port-Based Firewall Rules
To enable a specific port as a firewall rule, use the –add-port option. It’s important to remember, however, that when manually defining port rules, both the port number and protocol (either tcp or udp) must also be included. An example might be:
# firewall-cmd --zone=public --permanent --add-port=5900/udp
You can specify a range of ports when adding a rule using firewall-cmd like this:
# firewall-cmd --zone=public --permanent --add-port=5900-5999/udp
Creating a New Zone
If you wish to create an entirely new zone, such as myoffice, which is what I have done in CentOS 8 Server, then you can do so as follows. This zone can be managed like any of the other zones that exist in firewalld:
# firewall-cmd --permanent --new-zone=myoffice
Once this new zone has been added to firewalld, the service must be restarted:
# firewall-cmd --reload
Changing Zone/Interface Assignments
Each interface on the CentOS 8 System must be assigned to a zone. In addition to assigning a zone to an interface, you can also reassign a zone that has been previously assigned to an interface using the firewall-cmd command. The following command will change the enp0s3 interface to the trusted zone:
# firewalld-cmd --zone=trusted --change-interface=enp0s3
Masquerading
Masquerading in networking is just another term for Network Address Translation (NAT). When a CentOS 8 Server is used as a gateway to the Internet for a network of nodes on an internal LAN, masquerading allows these nodes to use the same IP address as the Centos 8 Server when communicating over the Internet. This hides the internal IP address of each node on the LAN and also alleviates the need to assign individual public IP addresses to every node on the LAN. You can use the following command to determine whether masquerading is already enabled on the firewall:
# firewall-cmd --zone=external --query-masquerade
You should use the following command to enable masquerading permanently in the firewall:
# firewall-cmd --permanent --zone=external --add-masquerade
Implementing Port Forwarding
Port forwarding is a network technique which allows network traffic arriving at the firewall via the Internet (when masquerading is also implemented) on a specific port to be forwarded to a particular system node on the LAN. An example of port forwarding is explained as follows. Suppose that we have a CentOS 8 Server acting as a gateway for our network. Assume that one of our network nodes is configured as a web server with a static IP address of 192.168.1.34/24 assigned. If the web server is set to listen on port 80 for traffic at that IP address, then when a request for a web page for the site domain on that server comes in from the Internet to the CentOS 8 Server gateway, if port forwarding for web traffic is configured on the CentOS 8 Server to redirect those requests to the node at the IP address of 192.168.1.34/24, then the web server will properly receive the request and serve up the
web page back out to the Internet to the originator of the request. To setup port forwarding in CentOS 8, you must first implement masquerading as follows:
# firewall-cmd --zone=external --add-masquerade
Here, we assume that the external zone is the appropriate zone the CentOS 8 Server interface to the Internet is assigned. If we wish to forward from a port to a different local port, the following command would be used:
# firewall-cmd --zone=external --add-forward-port=port=22:proto=tcp:toport=2250
In this example, any TCP traffic arriving on port 22 will be forwarded to port 2250 on the local system. The following command, on the other hand, forwards port 20 on the local system to port 22 on the system with the IP address of 192.168.1.19:
# firewall-cmd --zone=external --add-forward-port=port=20:proto=tcp:toport=22:toaddr=192.168.1.19
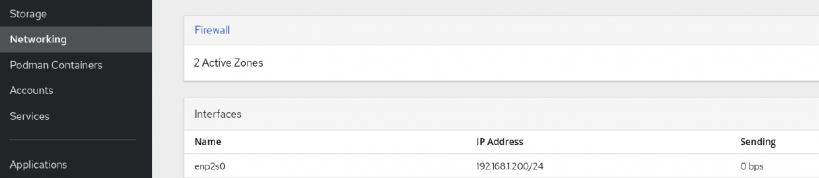
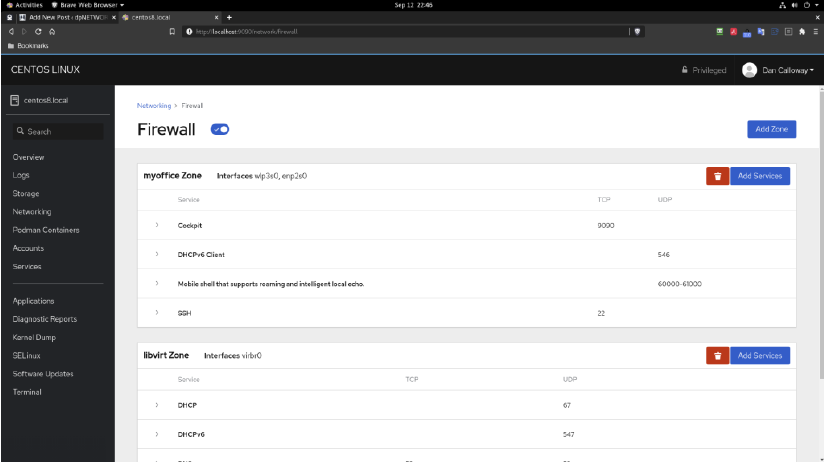
Managing firewalld Using Web-based Cockpit
Thus far in this blog article, I’ve looked at an overview of firewalld and discussed how we can use the firewall-cmd CLI tool to manage firewall zones and interfaces. Firewall-cmd provides the most flexible means for managing the configuration of the CentOS 8 firewall. However, it is also possible to view and manage the services for the default zone within the web-based application called Cockpit. To access the firewalld settings, we need to sign into Cockpit via a web browser, then select Networking from the Navigation panel and click on the firewall link. If Cockpit is not installed on the CentOS 8 system, we can install it using the command:
# dnf install cockpit
Once installed, go to a web browser on your CentOS 8 Server and enter the following:
http://localhost:9090
If accessing Cockpit from another system on the LAN, then replace localhost with the IP address of the CentOS 8 Server while in a web browser on that system to access Cockpit instead. The firewall interface in Cockpit will look something like this:
Once we click on the Firewall link it opens in the browser to reveal the services which are running in the default zone. In the image below, the default zone for my CentOS 8 Server system was set to the myoffice zone. You can see the services that are running and I have the ability to add other services using the ADD button or remove existing services using the Trashcan icon. I also have the ability to add other zones using the Add Zone button as well. And, lastly, we can turn the firewall ON and OFF from this interface if we need to.
Managing firewalld Using firewall-config
If your CentOS 8 Server has a graphical desktop (GUI), then the firewall can be configured and managed using a GUI tool called firewall-config. Not all CentOS 8 Servers have a GUI (unless we add this during the installation or post-installation) and so it may not be an available tool to use. If you do have the GUI, by all means using firewall-config has its
advantages. The firewall-config tool is not installed by default, so you will need to install it. The command to do this is:
# dnf install firewall-config
After installing this tool, then launch the tool from the terminal by typing in:
$ firewall-config
The key areas of the tool will be displayed. These are:
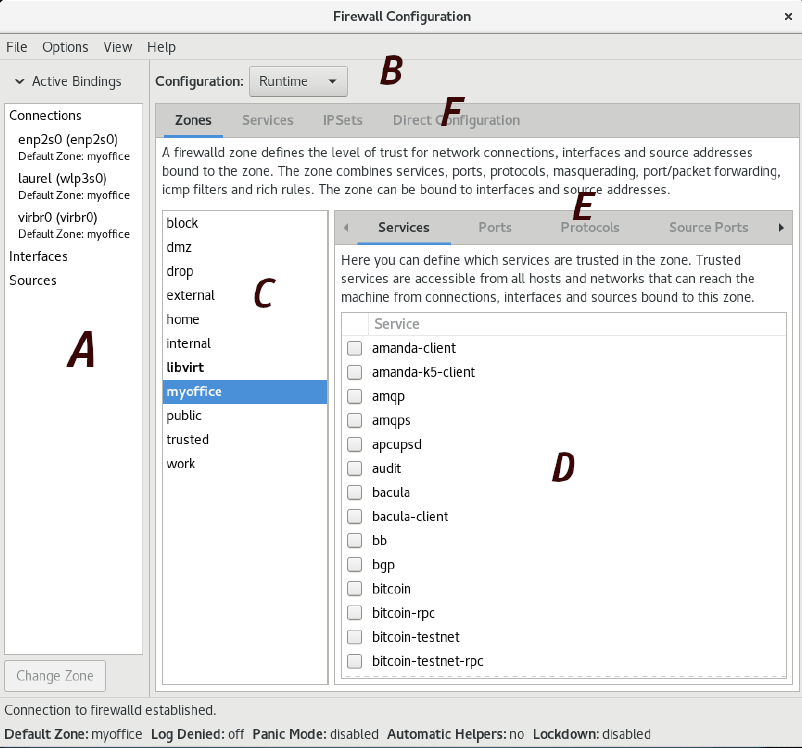
- A – Displays all currently active interfaces and zones to which they are assigned. To assign an interface to a different zone, select it from this panel, then click on the Change Zone button and select the required zone from the resulting dialog.
- B – Controls whether the information displayed and any changes made within the tool apply to the runtime or permanent rules.
- C – The list of zones, services or IPSets configured on the system. Selecting an item from this panel updates the information updates the main panel marked D.
- D – The main panel which contains information about the current category selection in toolbar E.
- E – Controls the content displayed in panel D. Selecting items from this bar displays the current rule for the chosen category.
- F – Controls the list displayed in panel C.
The firewall-config tool allows you to intuitively and straightforwardly work with tasks available with firewall-cmd except in a visual as opposed to a terminal environment.
- Log in to post comments