The concept of docker containerization in Linux is very similar to the concept of virtualization. Using virtualization in Linux is accomplished through the use of a hypervisor, such as VMWare, Virtual Box, or Virtual Machine Manager. Virtualization allows one to run small Virtual Machines (VMs) on one server platform and they each exhibit the functionality and performance of physical servers, yet are virtual. Containers are not actual servers; that is to say, not in the same way one would typically think of servers. Instead, unlike VMs which typically have a dedicated CPU, containers share the CPU with the host machine. VMs generally have their own kernel, but containers, on the other hand, share the kernel of the host platform. VMs are not very resource efficient in that the CPU, memory resources and disk space allocated to them are often wasted especially if applications are sitting idle and don’t utilize those resources very well. In essence, resource efficiency is a weakness attributed to VMs which containerization attempts to overcome. So, exactly what is a Linux container? It’s probably best to think of containers in Linux as filesystems rather than VMs. The containers themselves match the file structure of the operating system distribution they are based on. Thus, a container based on MX-Linux, for example, would have the same file structure as an identical installation of MX-Linux on a VM or on a physical bare metal device. One of the best features of Linux containerization is portability. Linux containers are self-contained and can be shared with many developers who can review the operating system changes and make recommendations prior to the container being published. The containers that one creates run identically on any host system regardless of whether it is MacOS, Microsoft Windows, or various distributions of Linux. Virtual Machines allow this as well, but with containers, it is much easier to implement.
Installing Docker
For the illustrative purposes of this article, I will be using MX-19.3 Linux as the host operating system. A great plus with Linux containerization is the ease with which it can be installed on a system. So, for example, in MX-19 Linux, to install docker, it’s as easy as running the following command in the CLI:
$ sudo apt install docker.io
Unbelievably, that’s all there is to installing docker on your system for creating your very first Linux docker container. Unlike many KVM or kernel-based Virtual Machines, there’s no need to install multiple packages and tweak configuration files post-installation to get it up and running. Once installed, you’ll want to check to see if docker is actually running. If you’re running systemd (MX-19 Linux can be run in both init and systemd modes).
If you don’t know whether you’re running systemd or init for your Linux distribution, you can verify this by entering the terminal and issuing the command:
$ ps p 1
In my particular case, the output was the following:
| PID | TTY | STAT | TIME COMMAND |
| 1 | ? | Ss | 0:02 /lib/systemd/systemd |
Clearly, I’m running systemd. Otherwise, I would get output that indicates I’m running init instead. Most modern distributions of Linux today run systemd with a few exceptions. You can verify whether docker is running by issuing the following command in the terminal:
$ systemctl status docker
If docker is running and enabled, you should get the following output after running the above command:
$ systemctl status docker
● docker.service - Docker Application Container Engine
Loaded: loaded (/lib/systemd/system/docker.service; enabled; vendor preset:
enabled)
Active: active (running) since Tue 2021-03-09 22:55:53 EST; 13h ago
Docs: https://docs.docker.com
Main PID: 4755 (dockerd)
Tasks: 25
Memory: 65.5M
CGroup: /system.slice/docker.service
├─4755 /usr/sbin/dockerd -H fd://
└─4762 docker-containerd --config
/var/run/docker/containerd/containerd.toml --log-level info
Note above that this output indicates that docker on my system is both active (running) and enabled. If your docker instance isn’t running or enabled, you can accomplish both turning on docker and enabling it at the same time by running the command:
$ systemctl enable --now docker
Then, you can repeat the command shown above for verifying the status of docker on the system. In addition to installing docker on the system for the purposes of creating Linux containers, we have access to all the docker commands which we can issue in the terminal for working with docker. By default, using docker in your host system requires you to have sudo privileges. So each command you issue will require the use of sudo. If you don’t want to have to pre-pend sudo each time you issue a docker command in the terminal, a simple fix is to add yourself to the docker group. You can accomplish this by issuing the command:
$ sudo usermod -aG docker <yourusername>
This command preserves the groups to which you are currently a member and adds you to the auxiliary group docker which was created when docker was installed. You may need to reboot your system for this membership to take effect. Then, verify that you are a member of the docker group by running the command:
$ cat /etc/group | grep docker
docker:x:129:datapioneer
Here, datapioneer is my username on the MX-19 Linux system. You’ll need to substitute your username when entering the command on your system. This indicates that datapioneer is a member of the group docker on the system, and I’ll no longer need to use sudo when issuing commands under docker.
Managing Docker Containers
Now that docker is installed on our Linux system, we can start using it to run a multitude of operating systems in the containers we create. In order to do this, we will need to issue various docker commands available to us and search for docker images which contain those operating systems. For example, if we wanted to run Ubuntu as a docker container, then we would need to search the docker.io database of images and pull down this image into docker to run it. To search for an Ubuntu image in docker, we can issue the command:
$ docker search ubuntu
The search results for my system resulted in the following output:

This indicates that the Ubuntu docker image is available on docker.io for me to grab and use to run as a Linux docker container. In order to grab this image, I need to issue the pull command associated with docker to pull down the image on my system. To accomplish this, issue the following docker command in the terminal:
$ docker pull ubuntu
This command will pull down the latest docker image of the Ubuntu operating system on Docker Hub for our use. This will download the latest image onto our system and store it locally on our system where we will be able to use it later on to create additional containers from it. The process should look similar to this:
$ docker pull ubuntu
Using default tag: latest
latest: Pulling from library/ubuntu
5d3b2c2d21bb: Pull complete
3fc2062ea667: Pull complete
75adf526d75b: Pull complete
Digest: sha256:b4f9e18267eb98998f6130342baacaeb9553f136142d40959a1b46d6401f0f2b
Status: Downloaded newer image for ubuntu:latest
If you are curious as to which images you’ve just pulled down locally on your system, you can determine this by issuing the following docker command:
$ docker images
Here is the output I received when running the above command:

Note in the above output to the terminal, the Image ID. This is an important piece of information that we will need in the future when working with docker containers. If, for example, we wanted to remove this image from our local system, we could do this by referencing the Image ID in the following CLI command:
$ docker rmi 4dd97cefde62
When I ran this command in my MX-19 Linux system, the following output resulted:
$ docker rmi 4dd97cefde62
Untagged: ubuntu:latest
Untagged:
ubuntu@sha256:b4f9e18267eb98998f6130342baacaeb9553f136142d40959a1b46d6401f0f2b
Deleted: sha256:4dd97cefde62cf2d6bcfd8f2c0300a24fbcddbe0ebcd577cc8b420c29106869a
Deleted: sha256:95bc1f83306cc7ebaa959492929d6624b0cc1bb6ba61be1cd04fed7d39b002fc
Deleted: sha256:a0fcf305193749a4fe8c9da074c4781a0f1e63f2c5b5a979a88597ada5c74645
Deleted: sha256:aeb3f02e937406fb402a926ce5cebc7da79b14dbcb4f85a5ce0e3855623cec80
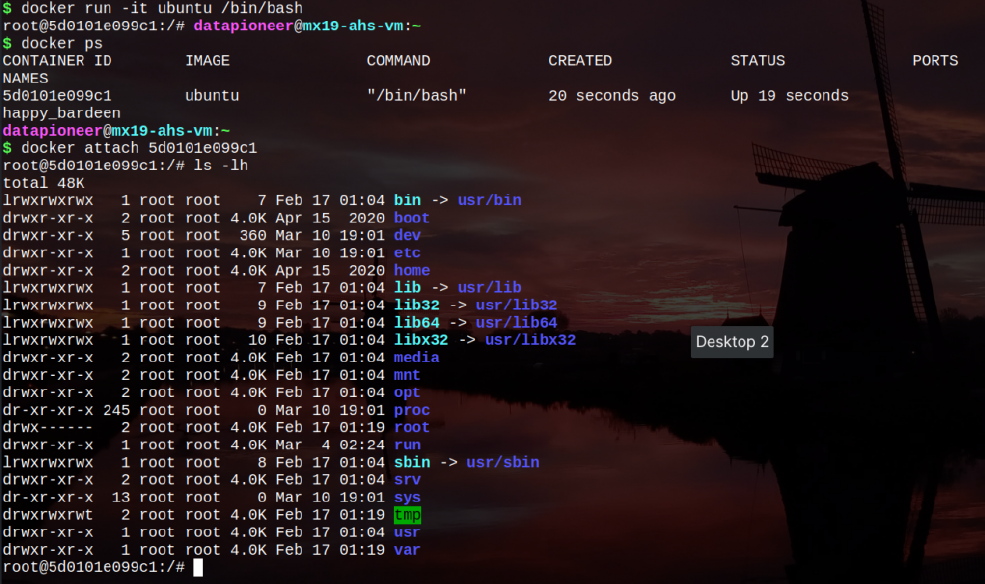
Now that the Ubuntu docker image is downloaded locally on our system, we can create additional containers from it using the docker run command, followed by the name of the image and an application within the image to run. For example:

An application (/bin/bash, in this case) run from inside a docker container is known as an EntryPoint. This is another name for an application that a container is configured to run. The -it option following the run command places docker into interactive mode and moves the user into a tty. For a complete list of options, run the –help switch after docker run to list them out. Note above that by running the /bin/bash application interactively and designating the tty as the interactive terminal, I am taken out to the / (root) directory in the Ubuntu container as root user. In the above example, I ran the ls -lh command to long list in human-readable format the structure of files in the Ubuntu container. This file structure is not the structure of my host Linux system, but rather of the docker container operating system, Ubuntu. While in the docker container of Ubuntu, you can issue any commands that you would normally enter in any regular Ubuntu installation.
One thing that we should make clear here about Linux containers is that when you pull down a docker image from Docker Hub as we did in the above example, the image that’s pulled down to the system locally is not a container, but rather an image. This image doesn’t become a Linux container until we run an instance of it. When the command that’s being run inside the container finishes, the container goes away. Therefore, it’s important to realize that when you issue the command /bin/bash in the Ubuntu container that gets created and install a lot of packages, these packages will be wiped out as soon as you exit the container. Another way to look at it is to think of a docker image as a blueprint for a container that can then be used for creating other containers.
The reason I wanted to make this point clear to you is that if you create an Ubuntu container by running the instance of /bin/bash inside of the image you pull down from Docker Hub, then use a command like Ctrl + d or issue exit, then hitting the Enter key on the keyboard to get out of the container, everything that you did in that container will be destroyed because you have removed that container; that is to say, docker containers typically exist only while they are running. So, after creating my first docker container of Ubuntu, I run the command:
$ docker ps
This will list out all existing docker containers on my system. The output that I received looked like this:

Note that the Container ID, Image name, Command issued to create the container, the time since the container was Created, the Current Status of the container and Ports information, if applicable is listed out. You can ignore the keen_elion shown above as this is an easter egg created by the developers of Linux containers and this name changes each time a container is created. If you’ve created more than one container currently existing on the system, you can add the -a option to the docker ps command in order to see all of them at once.
At this point, you may be asking how then can we exit a container without deleting it from the system. This is very easy to do. While in a container, if you want to jump out of that container and return to the host operating system, simply press the keyboard keystrokes of Ctrl + p + q without letting up on the Ctrl key. This bumps you out of the container you’re running without removing it.
So, if I create a new docker container using the Ubuntu image, then run Ctrl + p + q to jump out of the container without removing it, then want to get back into the container, I can do this by issuing another command called:
$ docker attach <container id>
and the result of this action will be similar to the following:
Note, in the above output, I was temporarily in the command prompt of my host system rather than the Linux container, then reentered the Linux container using the docker attach <container id> command. Any containers which have been stopped can be restarted using the command:
$ docker start <container id>
Another command we can use to obtain information about our running and non-running containers is this command:
$ docker info
When I issued this command on my Linux host system, I get the following output:
$ docker info
Containers: 2
Running: 1
Paused: 0
Stopped: 1
Images: 1
Server Version: 18.09.1
Storage Driver: overlay2
Backing Filesystem: extfs
Supports d_type: true
Native Overlay Diff: true
Logging Driver: json-file
Cgroup Driver: cgroupfs
Plugins:
Volume: local
Network: bridge host macvlan null overlay
Log: awslogs fluentd gcplogs gelf journald json-file local logentries splunk syslog
Swarm: inactive
Runtimes: runc
Default Runtime: runc
Init Binary: docker-init
containerd version: 9754871865f7fe2f4e74d43e2fc7ccd237edcbce
runc version: 1.0.0~rc6+dfsg1-3
init version: v0.18.0 (expected: fec3683b971d9c3ef73f284f176672c44b448662)
Security Options:
apparmor
seccomp
Profile: default
Kernel Version: 5.8.0-3-amd64
Operating System: Debian GNU/Linux 10 (buster)
OSType: linux
Architecture: x86_64
CPUs: 2
Total Memory: 3.846GiB
Name: mx19-ahs-vm
ID: MLNU:TZTR:QQMO:GTJU:WSJG:UQUM:AHZI:USSZ:Y2NU:VB6I:Z6XZ:LAHV
Docker Root Dir: /var/lib/docker
Debug Mode (client): false
Debug Mode (server): false
Registry: https://index.docker.io/v1/
Labels:
Experimental: false
Insecure Registries:
127.0.0.0/8
Live Restore Enabled: false
As you can see, there is quite a bit of information being sent to the terminal that lets us know how many containers are running, how many are stopped, how many have been paused, the number of images we have locally installed on the system, the kernel version, operating system, OS type, number of CPUs in use, and more.
A Linux container is not a service, per se, on the system. Instead, it is a collection of namespaces, such as a system namespace and a namespace for a user. A container, however, can be run in the background (similar to how a service runs in Linux) by issuing a command when creating the container that forces the container to run in detached mode. To accomplish this, you would create the Ubuntu container we ran earlier in normal mode by issuing the command:
$ docker run -dit ubuntu /bin/bash
Here, the -d in the options list indicates we wish the container to be created via the /bin/bash instance on the Ubuntu image but we would like it to continue running in the background. You can then verify that the container is running in the background by using the:
$ docker ps
command, which will list its status as such. A common use case for creating a Linux container would be to run an operating system like Ubuntu in a container created by installing and configuring the Apache2 web server, including a virtual host. If we create the instance of the Apache2 web server this way, then how can we access it? This is accomplished very easily by port redirection. Docker supports port redirection, so we should be good to go. So, let’s create a new container in detached mode of the Apache2 web server and redirect port 80 to 8087. This is accomplished as follows:
$ docker run -dit -p 8087:80 ubuntu /bin/bash
I’m using port 8087 in this example, since I have ports 8080 through 8086 in use on my host system. When I create the new container and direct it to run in the background redirecting port 80 to port 8087, and issue the command to list out the current containers on my system, I get the following output:

As you see above, I now have two containers running as reflected in the additional container id starting with 97b20ea... created from the Ubuntu image and where ports information is now visible indicating a redirection of port 80 to 8087 tcp. Now, to get into the latter container where we will be installing the Apache2 web server to serve up web pages locally, we can issue this command:
$ docker attach 97b20ea...
which will put us back into the Ubuntu container using that container id. We do not have to enter the entire long string for the container id, but only just enough information from the container id so that it is unique on the system. Now, to install the apache2 web server in our Linux container running Ubuntu, we would normally issue the command:
$ sudo apt install apache2
But, when I run this command, I get a warning that sudo isn’t recognized and when I reissue the command with the “sudo” pre pended, I obtain the following output:
root@97b20eaba04f:/# apt install apache2
Reading package lists... Done
Building dependency tree
Reading state information... Done
E: Unable to locate package apache2
which indicates that the Ubuntu container either has an outdated repository or the repository index is missing. To fix this, we need to issue the following command to update the repositories:
$ apt update
Then, after updating the repositories and/or creating the repository index, you would install the apache2 web server by issuing this command:
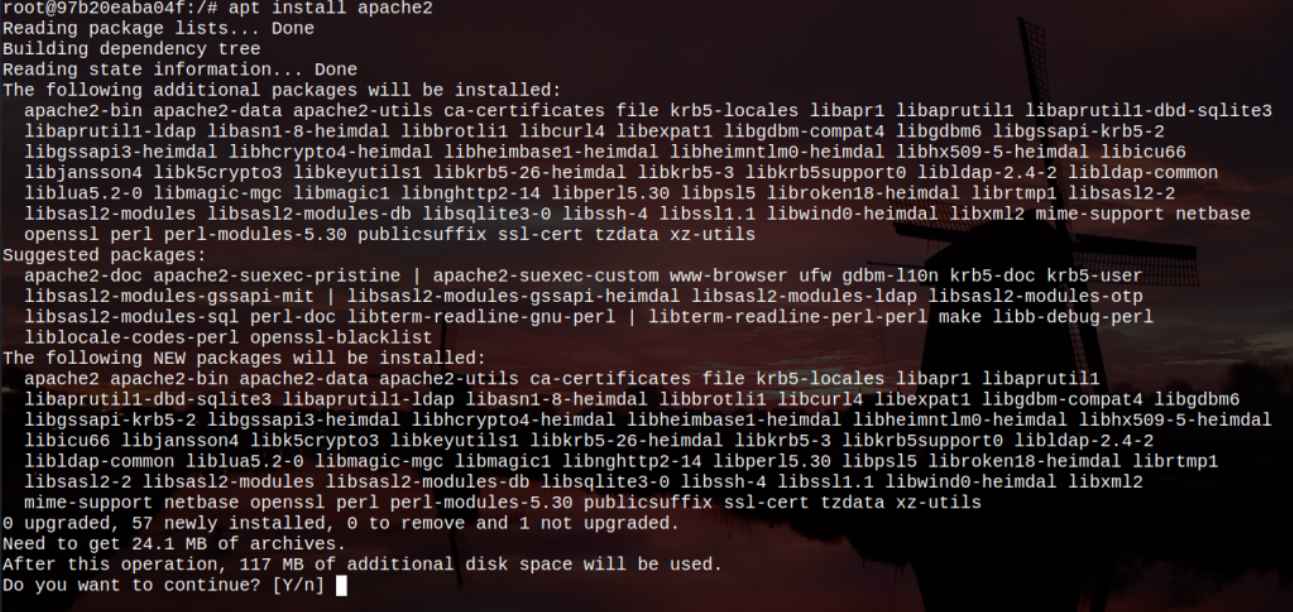
Hitting the Enter key to accept the “Y” menu here to install Apache2 will begin the installation process. You may be prompted for locale information during the installation. Just follow the prompts to complete the installation process. After Apache2 web server has been installed, it will need to be started. To accomplish this on our Linux container of Ubuntu, issue this command in the terminal:
$ /etc/init.d/apache2 start
After performing this, the following output is sent to the terminal indicating that the Apache2 web server has successfully started:

And, finally, if we open a Web browser on our host Linux system and navigate to localhost:8087, the following homepage for the Apache2 web server is served up to us indicating a successful installation, configuration, and running instance of the Apache2 web server in our Ubuntu container.
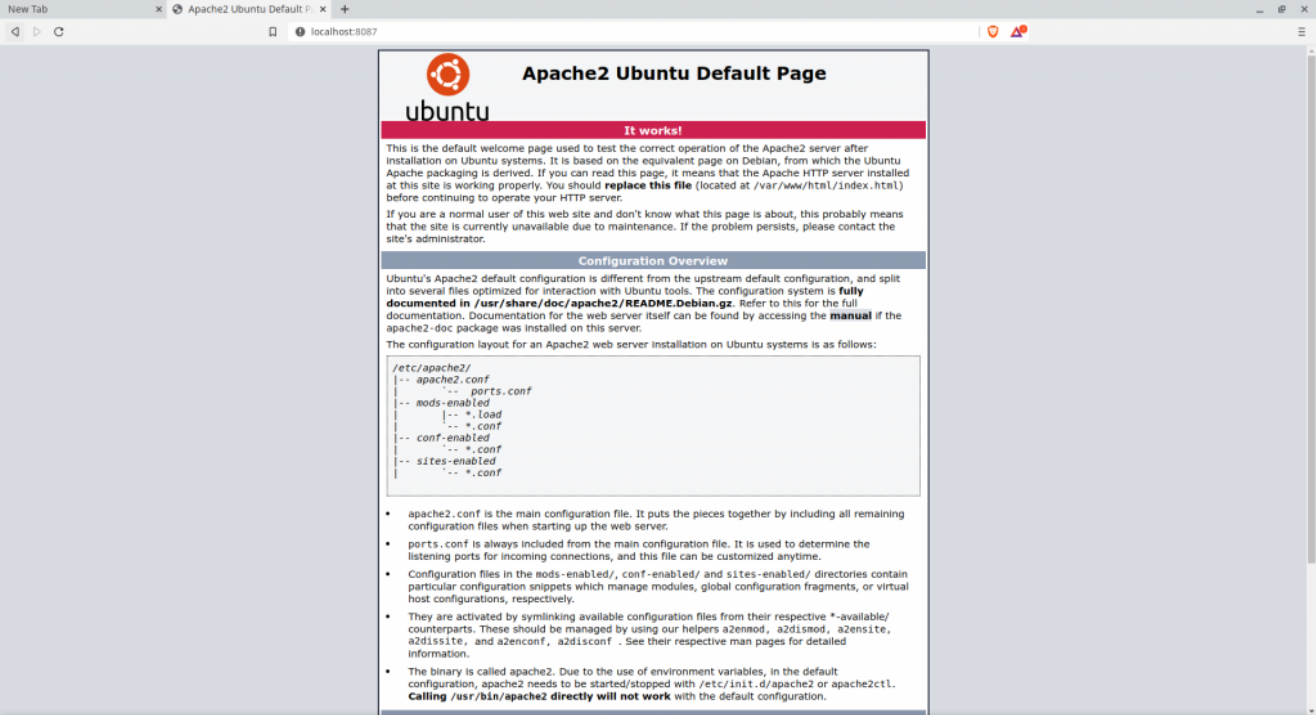
Congratulations! If you’ve been replicating what I did here in this article, then you have successfully created a running instance of the Apache2 Web Server as a Linux Container application rather than installing it directly on the host Linux system. In addition, our container application is running in the background listening on all IP addresses, port 80 tcp (which is being redirected to port 8087 on my system for the purposes of this demonstration), and responding to HTTP requests. But, what if we want to create our own image of this working Apache2 webserver to deploy to another machine? Can we do that? Certainly, we can! How can we accomplish this?
To create an image of the working Apache2 web server container created above, we need to first obtain the container id of this working container using the docker ps command we used earlier, then use it in the docker commit command to create our own image of it. The command would look like this:
$ docker commit 97b20eaba04f ubuntu/apache2-server:1.0
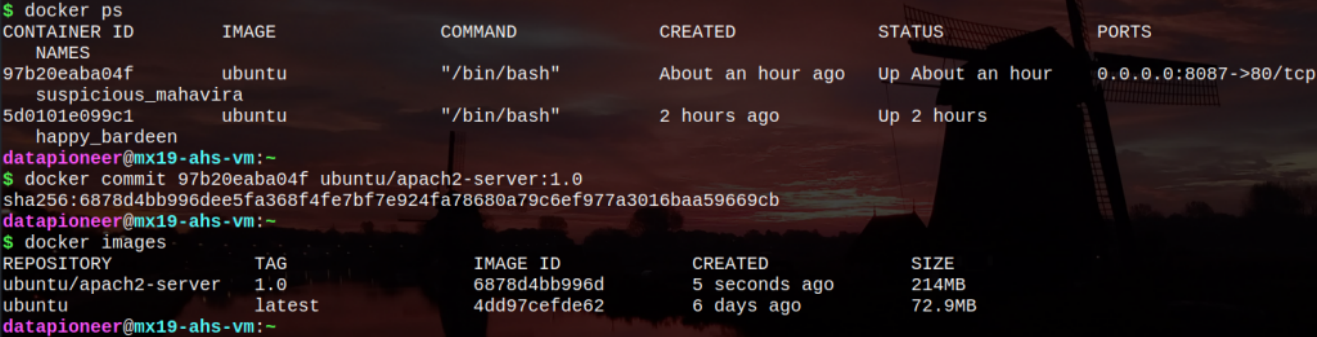
Note in the print out of the docker images (shown above) the ubuntu/apache2-server:1.0 image is showing in the list and is 214MB in size. Now, this is an image, not a container. But, we can take this image to another machine and spin up another Ubuntu container based on this image rather than the one we pulled from Docker Hub which did not contain the running Apache2 web server application running in the background. To create the new container from the newly-created image, simply repeat this command based on the new image and tag:
docker run -dit -p 8087:80 ubuntu/apache2-server:1.0 /bin/bash
This will create the new container with the running Apache2 application running in the background. You may have to stop the original container we created the image from before this is successful since the new container based on our new image is using the same port redirection. To stop a running container, issue the command:
$ docker stop <container id>
and the old container will stop allowing the new container to start up.
This example is a simple one, but it shows you just what you can do to successfully pull down a Docker Hub image, run a container, then create another image from the original container and deploy that to another machine. This example shows how a docker container of a working application which runs in the background can be used in Linux very effectively as a working web server.
- Log in to post comments